Facebook Business Manager Verification
Below are the things to keep in mind, before you begin with the process:
- Make sure that you have a personal Facebook profile to confirm your identity, it might be needed for the verification.
- As a next step, you will need a Facebook profile to create a Business Manager account. You can use your Facebook username and password to sign in to Business Manager. It’s a more secure way to log in, than with just an email address and password and both will have a link.
- You can create a max of two Business Manager accounts by an FB profile. If you need more, please use any other FB profile to create additional Business Manager accounts.
Create a Facebook Business Manager Account
- Log on to business.facebook.com/settings.
- Click on Create Business.

- Enter your business name, your name, and work email address.
- Click on Submit.
- If a business account is already associated, then directly click on the ORG to enter FB business profile.
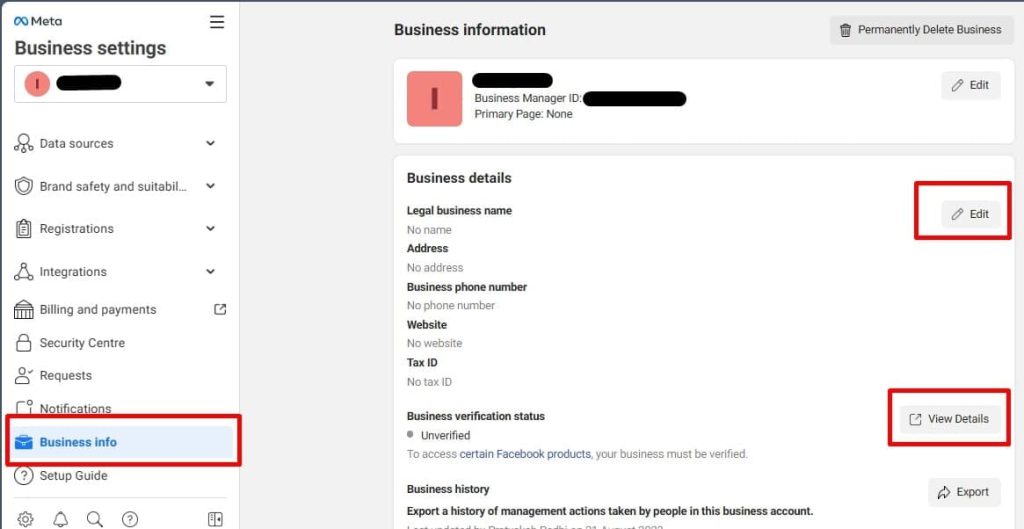
- On the left tab, please navigate to Business Info.

- Check if the Business Verification status is Verified / Unverified.
- If Unverified, navigate to Business Details ? Click Edit, and enter the details that exactly match with the Legal Document of your Organization.
Preferred docs: GST, COI, Phone Bill, and Bank Statement
Refer this URL for accepted documents – https://www.facebook.com/business/help/159334372093366

- Next, go to the Business Manager’s Security Centre.
- Click Start verification.

The Legal Name in the legal document (required for verification) should be present in the website’s footer, as shown below –

- Please add your organization’s details.
If you’ve already filled in your company details in the Business Info section, this section will be auto-filled.
Double-check the information to ensure that they are accurate as per your legal document.

- Add supporting documents to prove your business legal details entered, and click on submit.

- Select your preferred contact method to receive a confirmation code to confirm your connection to the business.

- Preferably, select Email and provide your Email ID associated with your organization (domain associated with your website) to get a confirmation code. This step depends on the contact method you’ve selected in the previous step.
- Input the confirmation code and click Next. If you did not receive a verification code, click on Resend Code. You can also change your preferred contact method if your chosen method isn’t working.


